Table of Contents
Flame of Annihilation an Inquisitor guide by Cruro

I try my best to keep the guide updated and keep in touch with other Inquisitor mains, but I still recommend to double check with the community before making any big commitments: See #acolyte in gemstonero-discord
Prologue
Inquisitor is the 4th job class that follows the tree of: Acolyte → Monk/Champion → Sura → Inquisitor
As such it retains some of the useful utility skills that Priests enjoy, like Teleport/Warp/Pneuma and buffs like Agi Up/Blessing, while gaining new powerful offensive options.
Their acolyte-heritage should not be confused with a support class though, Inquisitor is first and foremost a dps class with some utility options on top.
| Strengths | Weaknesses |
|---|---|
| * Fastest movement in the game with Snap * Active and engaging gameplay that can feel satisfying to use * Very fast and decently strong farmer with self-targeted AOE (Explosion Blaster) * Very strong, AP-dependant, melee, big damage number nuke (Third Flame Bomb) * Hybrid build is possible to cover either builds weaknesses for the most part * Third Flame Bomb build has very high sustain due to scaling with health (useful in endgame) | * Very expensive to gear if you want to utilize both builds * Far from a one-button class → can be tiring in long farming sessions * Third Flame Bomb gets countered by reflect, NPC_AGIUP, or simply dying (loss of AP) * Third Flame Bomb can be mechanically tricky to use consistently * Getting dispelled stops most momentum until you rebuff (Third Flame Bomb-related buff is not dispellable though) |
Beginner Chapter: Basic Techniques
Stats and Traits
- Str: As a knuckle (or mace) wearer, this increases status-atk by a high amount. It also helps with carrying more loot. Recommended: 90 - 120 (120 when using
 Happy Card (300271) -combo).
 - Agi: Increases aspd and flee. Aspd is important to fluently chain skills. Recommended: Whatever is needed to hit 190+ aspd with consumables (might only be possible with later gears that also give aspd)
- Vit: Increases your maximum health and resistance to certain status effects. Recommended: 90 - 120.
- Int: Reduces variable cast time (half as efficient as dex) and increases maximum SP as well as SP recovery. Recommended: 60 - 90.
- Dex: Reduces variable cast time and increases hit. Recommended: 90 - 120 (120 when using
 Empathize Card (300270) -combo).
 - Luk: Increases crit-rate (Cri), slightly increases status-atk and gives resistance to curse. Recommended: 30 - 120 (depending on Cri-needs)


For traits, only the following matter for offense:
- Pow: Every 3 Pow increases P.Atk by one. P.Atk is a new final damage modifier (similar to range%, melee% and crit-damage%) that has been introduced with 4th jobs. Recommended: 100
- Con: Additionally, every 5 Con also increase P.Atk and give some secondary stats like hit, flee. Recommended: Either 35, 45, 90 or 100 (depends on build/gears, see specific chapters).
- Crt: Increases C.Rate, a new final modifier similar to P.Atk but for critical damage only (not to be confused with your critical hit chance, aka. “Cri”). Recommended: Either 35, 45, 90 or 100 (depends on build/gears, see specific chapters).
Relevant Skills
Buffs and utility skills
 Body Relocation (Snap): This is the reason to play this class. It grants you the fastest movement in the game, but it also aids as an additional tool to fight position bugs - the cell you snap to is definitely where you character is standing.
Hint: Make sure to set /camera to disable camera smoothing (you will want your character to always be dead-center of the screen) for much simpler snapping.
Movement speed stops mattering entirely if you can simply chose where to exist in space. Once you unlock Snap, you will never walk again.
 Rising Dragon: Bumps your sphere-limit to 15 and spawns all of them immediately, grants additional HP/SP, and puts you into “Explosion Spirits”-state which removes sphere-consumption from Snap.
The first skill you are going to press before doing anything and mandatory to keep up.
 Dangerous Soul Collect (Zen): Instantly calls the maximum amount of spheres. If you're missing spheres, this is the basic tool to gain them back, pretty straight-forward.
Cast can be cancelled, so it requires either -1s FCT to remove cast time entirely, or you can snap away from a mob to not get interrupted so easily and snap back. Alternatively you can also just cast  Rising Dragon again if it's off cooldown as it has no cast time that can be interrupted.
 Power Absorb: Consumes all your spheres and grants back 1% SP for each sphere that has been consumed. With Rising Dragon active, this is a handy tool to regain 15% SP immediately.
 Teleport: Essential for field/dungeon farming. Allows you to teleport to a random spot (put Lv1 on your hotkeybar to avoid the popup-window).

 Increase Agility: The increased movementspeed is irrelevant to us, but the additional Agi helps our attack speed, which is absolutely welcome.

 Blessing: A nice +10 boost to Str/Int/Dex. However, it also clears Curse-status from yourself and others, and Stone-Curse-status from others.

 Gentle Touch-Cure: Removes various negative status effects, with the more important ones being: Freeze, Stone Curse and Hallucination (upside-down screen). This skill can even be casted while Frozen/Stone-cursed yourself, which is extremely rare and valuable.

 Gentle Touch-Revitalize: Increases Max HP by 10% and also boosts Def/HP-recovery. Second-best option for HP-scaling skills like
  Tiger Cannon and
  Third Flame Bomb. Cannot be used together with
  Gentle Touch-Change (which is still a slightly better offensive option).


- Gentle Touch-Change: Increases Atk% and flat Atk. Useful for all attack-skills that do not scale with HP. Cannot be used together with Gentle Touch-Revitalize.
 Powerful Faith: Adds +15 P.Atk. Especially noticable during early- and mid-game where there are not many sources of P.Atk from gears yet. Cannot be used together with
  Firm Faith (which after recent hp% buff fixes is not worth using anymore for either build).


 First Faith Power: Self-buff that removes sphere consumption of Fallen Empire. Mainly only used as a stepping-stone for
  Judge.
- Judge: AP-consuming self-buff that additionally removes sphere consumption of Flash Combo. Mainly only used as a stepping-stone for
 Third Exorcism Flame.
- Third Exorcism Flame: AP-consuming self-buff that additionally removes sphere consumption of Tiger Cannon. Mainly only used to enable usage of Third Flame Bomb-combo.
Attack Skills
 Oleum Sanctum: Not a strong skill on its own, but it applies a heavy debuff on the targets that will make them receive +50% more damage from all range attacks (including your own).

Very useful in party scenarios with range-attackers or yourself on Explosion Blaster build.
 Explosion Blaster: Strong, self-targeted 9×9 Aoe attack that scales with range% and crit-modifiers. Base damage formula becomes even bigger against targets that are afflicted with the Oleum Sanctum debuff.

This lets you effectively double-dip on Oleum: You deal +50% more damage due to the applied debuff, and you also get the increased damage formula. This usually results in twice the damage for Explosion Blaster.
For more in-depth information, check Intermediate Chapter: Explosion Blaster.
 Massive Flame Blaster: Damage is negligible compared to other options, but it applies a self-buff for 2:30 minutes which will boost the next skill in this list

 Blazing Flame Blast: Highest dps ranged option for Inquisitor. With Time Gap Knuckle this becomes spammable and can be used to melt bosses. The downside it is single-target only.

 First Brand: Initial starter for Third Flame Bomb combo. Applies “Brand”-status on all monsters around the target in a 7×7 Aoe (needed for the next combo-step).

 Second Flame: Second step in Third Flame Bomb combo. Can only be casted on targets afflicted with the “Brand”-status. Applies the upgraded “Judgement Brand”-status on all monsters around the target in a 7×7 Aoe. Requires Third Exorcism Flame to be active.

- Third Flame Bomb: Finisher of the Third Flame Bomb combo. Can only be casted on targets afflicted with the “Judgement Brand”-status. Deals very high damage on all monsters around the target in a 7×7 Aoe. Requires Third Exorcism Flame to be active.
This skill scales with max HP, melee and attack modifiers. It deals three hits if 15 spheres are active (but does not consume any). Beware that it deals 0 hits with 5 or less spheres (e.g. when Rising Dragon runs out).
While this attack-chain can be tricky to perform correctly, it's currently known as the dps ceiling for any Inquisitor build in general.
For more in-depth information, check The Final Chapter: Third Flame Bomb.
Sphere Management
While other classes may have consumables like arrows or gemstones, Monk class uses a sphere-system that needs to be managed like a resource in order to be able to use certain skills or at least to use them at their full strength.
This used to be a limiting factor during Monk-era with skills like  Investigate,
  Finger Offensive and most notoriously
  Asura Strike, but it also carried on into Sura-era with skills like
  Tiger Cannon and
  Gate of Hell.
Those skills could only be used as long as you still have the needed amount of spheres (varies by skill). With insufficient spheres, they can be re-called using either  Call Spirits, or more likely its successor
  Dangerous Soul Collect (Zen) which will refill the maximum amount of spheres instantly.
Another important skill to mention here is the bread and butter  Body Relocation which normally also consumes spheres, unless you're in “Explosion Spirits”-state (usually by using Rising Dragon, or if it's currently in cooldown, alternatively
  Explosion Spirits).
For that reason alone, the “Explosion Spirit”-state should be kept up at all times.
The original maximum spheres used to be 5 spheres, at least until you're Sura and have access to Lv10 Rising Dragon which will bump the limit to 15 Spheres.
One very useful trick to maintain your SP is by occasionally using  Power Absorb to consume all 15 spheres, and in return grant an immediate 15% SP back.
With these things out of the way, sphere-management has been simplified a lot as Inquisitor. Neither of the main damage skill consume spheres at all, however Third Flame Bomb will scale its damage based on the amount of spheres currently active. So it's highly recommended to use Dangerous Soul Collect (Zen) or Rising Dragon whenever spheres might have been consumed (as Inquisitor that's usually just by Gentle-Touch buffs or Power Absorb).
On top of that, the Inquisitor-specific AP-consuming buffs even remove sphere consumption on most Sura skills (that we tend to not use anymore at this point though).
Intermediate Chapter:Explosion Blaster


Explosion Blaster is a 9×9 AOE based on ranged dmg and crit. This skill is further complemented by Blazing Flame Blast in single-target scenarios.
It is highly recommended to build for Aftercastdelay-reduction (ACDR), even far beyond the point needed to reduce the 1s ACD to match its 0.7s CD.
While the former would only require 30% ACDR, getting 50% and higher will allow you to snap away to the next target noticably faster.
Stats
- Str: 120
- Agi: 80 - 90
- Vit: 90+
- Int: 60 - 90
- Luk: 0 - 120
Heavily depends on your Cri-needs (see Secondary Stats below). Additionally, certain cards punish higher luk-values to the point where low (or even 0) luk might be preferable.
Traits
When using  Star Cluster of Concentration Lv.3 (310682) :
- Pow: 110
- Con: 105
- Crt: 77
Otherwise:
- Pow: 110
- Con: 72
- Crt: 110
Secondary Stats
- Cri: 140+
The actual amount of Cri needed depends on the target monster. In an ideal scenario 100 Cri would equal to 100% critical hit chance. However, enemy Luk will lower your chances of critting, that's why overshooting 100 Cri is often necessary. Concrete values can be checked by using @mi <monster-name-or-id> ingame and check for the crit-shield value. With the recommended Cri-value of 140, any target with a crit-shield of 40 and lower will always be critted. Certain endgame places may require even higher values, but that's relatively rare.
- Aftercastdelay reduction: 30 - 86%
30% is the bare minimum to use EB and BFB on cooldown, 50% when using dimension combo (EB-only), 60% with Time Gap (EB+BFB). However in order to be able to snap to the next target, at least 50% or higher is recommended for farming. Another breakpoint happens at 80% ACDR, which enables alternating between EB and BFB for the highest possible dps on ranged build.
Gears
Endgame
| Slot | Items | Cards | Notes |
|---|---|---|---|
| Headgear (Top) | Agi jewel can be a strong option as overshooting the required minimum ACDR required for EB/BFB can still be useful to get back to snapping faster after the attack and - at very high values (~80%) - allows alternating between both skills for increased dps. ACDR reduction will become even more valuable in the future when Time Gap weapon reduces CD of both skills even further. Inversely, luck jewel will yield a bit higher damage and helps out with boosting Cri. This makes either option viable in their own way. | ||
| Headgear (Mid) |
|
Any other mid headgear with ACDR-enchant can also be useful here | |
| Headgear (Low) | - | Blood sucker helps a lot with sustain, and would be the prefered choice for farming when a minor damage-loss is usually acceptable | |
| Armor | Nebula Suit of Creative starts beating Engraved Ice Storm Rune Suit once the matching enchants have been put on the HoL garment/accessory. Depth1 armor may still be favourable for casual farming where another +10% acdr can make things smoother.
Additionally, Star Cluster of Concentration tends to be slightly stronger than Star Cluster of Creative, given it's combo'd with the respective Signet enchant. For concrete testing results and additional guidance, please refer to Eneru's Crit Inquisitor guide. Generally, the Concentration-route lets you share the same trait build for TFB and EB build, while the Creative-route lets you share gears more easily with other crit-builds. The new Yoscopus Guardian + Yoster Negotiator combo is very strong, even beating many mvp card options. However, breaking the card combo by replacing the armor card with Encroached Tan Card still yields roughly an +8% damage-increase. | ||
| Weapon | Time Gap is generally recommended as it offers the highest dps for both,  Explosion Blaster and Explosion Blaster and  Blazing Flame Blast. While it is a clear winner for Blazing Flame Blast, the Dimensions weapon will actually yield slightly higher damage for Explosion Blaster (around ~9%) per use, however dps-wise this is more than compensated by the additional -0.1s CD reduction that Time Gap offers. This basically makes the Dimensions only useful if that slight difference is what's missing to oneshot a specific target. Blazing Flame Blast. While it is a clear winner for Blazing Flame Blast, the Dimensions weapon will actually yield slightly higher damage for Explosion Blaster (around ~9%) per use, however dps-wise this is more than compensated by the additional -0.1s CD reduction that Time Gap offers. This basically makes the Dimensions only useful if that slight difference is what's missing to oneshot a specific target.
| ||
| Shield |
+12 [A] |
Elite Rgan Guardian Card is slightly stronger (White Knight Card on weapon then needs to be replaced), but comes with a large luk-penalty | |
| Garment | Yoster Negotiator Card is usually the best option. Snow Angel may only be worth it, when also using Encroached Tan Card in armor (unverified). | ||
| Shoes |
|
Rgan can only be used with +12 gear For general use, +12A Gaebolg Boots already start beating +12A Ice Rune Boots by about ~4.3% - Ice Rune Boots can still be better in niche cases, where the elemental dmg-enchant can match the current target. Refining Gaebolg Boots is significantly cheaper compared to Yorscalp, so Reforming should generally be the last step. | |
| Accessories | On Stellar Seal, M.Archer tends to be slightly stronger than Sharp, at the cost of getting less CRI from geaers. Signet enchant needs to match the the Star Cluster enchant in armor. See notes on armor for comparison. |


Future gears (currently not obtainable)
| Slot | Item | Notes |
|---|---|---|
| any slot | - | - |
Midgame
Beware, the midgame section tends to be outdated
These are the gears I used while gearing up, and can be considered as a baseline, but definitely also check out the catch-up gears we received afterwards.
Namely: Dim Glacier/Glacier Armors and Gaebolg Armors, which are frequently dropped pre-refined by endgame players, and therefore usually cheap.
| Slot | Items | Cards | Notes |
|---|---|---|---|
| Headgear (Top) |
|
Bio5 headgear with acute is a decent filler until Temporal Circlet | |
| Headgear (Mid) |
|
Any other mid headgear with ACDR-enchant can also be useful here | |
| Headgear (Low) | - | Blood sucker helps a lot with sustain, and would be the prefered choice for farming when a minor damage-loss is usually acceptable | |
| Armor |
+11 |
|
- |
| Weapon |
+9 |
- | - |
| Shield |
+11 |
 Khalitzburg Knight Card (4609) Khalitzburg Knight Card (4609) |
Illusion Silver Guard is close to the best-in-slot option in raw damage |
| Garment |
+9 |
|
Use PCC either ungraded or up to +11 [C]. Any further investment is better placed in the endgame garment in above section. |
| Shoes |
+11 |
|
 Abysmal Merman Card (300144) requires to also use Abysmal Merman Card (300144) requires to also use  Abysmal King Dramoh Card (300150) in headgear Abysmal King Dramoh Card (300150) in headgear
|
| Accessories |  Void Mimic Card (300278) Void Mimic Card (300278) |
Automatic Boosters are pretty close to Varmundt Accessories at a fraction of the price if you can find the modules |


Shadow Gears and Costume Stones
| Slot | Item | Notes |
|---|---|---|
| Headgear (Top) |  Sura Stone (Top) (1000968) Sura Stone (Top) (1000968) |
- |
| Headgear (Mid) |  Sura Stone (Mid) (1000969) Sura Stone (Mid) (1000969) |
- |
| Headgear (Low) |  Sura Stone (Low) (1000970) Sura Stone (Low) (1000970) |
- |
| Armor | +10  Maximum Mammoth Shadow Armor (24679) Maximum Mammoth Shadow Armor (24679) |
- |
| Weapon | +10  Infinity Shadow Weapon (24386) Infinity Shadow Weapon (24386) |
- |
| Shield | +9/10  Separate Reload Shadow Shield (24746) Separate Reload Shadow Shield (24746) |
- |
| Garment |  Inquisitor Stone (Garment) (1001738) and Inquisitor Stone (Garment) (1001738) and  Critical Stone (Dual) (1000855) Critical Stone (Dual) (1000855) |
 Will of Faith Lv10 is necessary for maximum benefit Will of Faith Lv10 is necessary for maximum benefit
|
| Shoes | +10  Maximum Mammoth Shadow Shoes (24680) Maximum Mammoth Shadow Shoes (24680) |
- |
| Accessories | +9/10  Full Penetration Shadow Earring (24661) and +9/10 Full Penetration Shadow Earring (24661) and +9/10  Full Penetration Shadow Pendant (24662) Full Penetration Shadow Pendant (24662) |
- |
Buffs and Consumables
- Gentle Touch-Change (Sura): Minor attack (flat and percentage) boost
- Powerful Faith (Inquisitor): Nice +15 P.Atk for free
 Red Herb Activator (100232) : More damage if necessary
 Abrasive (14536) : Only necessary when really struggling with getting enough Cri
 Force Booster (102803)


The Final Chapter:Third Flame Bomb


Third Flame Bomb is a three-step combo that ends in a 7×7 AOE finisher based on melee dmg and your total health.
To be able to use the combo, it's necessary to activate the following three buffs in order:  First Faith Power →
  Judge →
  Third Exorcism Flame
While the first buff does not cost AP, upgrading to the final buff will consume a total of 100 AP (if the skills are maxed, if they are not, more AP is consumed). When done correctly, a bright golden circle appears behind the character.
The easiest tool to recover AP (when there is no healer NPC nearby) is casting Explosion Blaster. Since it's a self-targeted skill it can be used at anytime without requiring a target monster. However, this is usually only necessary when dying inside an instance. Using the Third Flame Bomb combo repeatedly will quickly recover any AP lost by activating the buffs to begin with.
Brand Mechanic
The combo itself uses a “brand”-mechanic. This is a kind of mark that is applied to all targets that are hit by a combo skill. The general flow is:
- First Brand will apply “Brand”-status on all monsters in a 7×7 area around the target
- Second Flame can only be used against targets with “Brand”-status. When hitting the target, all monsters in a 7×7 area receive the “Judgement Brand”-status (regardless if they had any brand on them previously). This will remove the “Brand”-status.
- Third Flame Bomb can only be used against targets with “Judgement Brand”-status. When hitting the target, all monsters in a 7×7 area will receive drastic damage. This will remove the “Judgement Brand”-status.
With the brand-mechanics in mind, the following two limitations may appear:
- On especially mobby maps, it can happen that the sprite of a monster with no brand or incorrect brand covers the correctly “branded” monsters, which can make it tricky or impossible to properly continue the combo. This can be fixed by simply restarting the combo from step 1, to ensure that all brands are applied in the right order.
- Multiple TFB Inquisitors against one target can steal each others brand, which interrupts the combo of the others. This is an unfortunate one :(
Third Flame Bomb with Zerocell weapon New
When using +12 [A]  Faithful Bandage [2] (560088) , only First Brand and Second Flame need to be used to cast the full combo. That way, TFB can be casted every 0.7 seconds.
Performing the combo can be trivial when setting both skills next to each other on Smart keys (turbo setup).
Third Flame Bomb with Dimensions gear
With the introduction of Dimensions gear ( Time Dimensions Rune Crown (Inquisitor) [1] (400538) +
  Dimensions Judgment Knuckle [2] (560060) ) from Depth 2 dungeons, there are now two alternative ways of casting Third Flame Bomb, each with their own advantages/disadvantages:
- One-Button TFB: This is the more obvious use of the new Depth gear combo, as it allows you to autocast the full combo by just using the initial skill (First Brand). Since First Brand doesn't need any AP buff, and autocasted skills ignore the buff requirements, this allows the usage of TFB at any time - effectively negating the need of AP buffs or AP in general. The downsides are, that auto-casted skills also don't gain any AP, and more importantly, First Brand CD increases by 1.5s to a total of 1.8s. This results in a dps loss as the additional damage from the newer gears cannot mitigate the heavily reduced rate at which the skill can be used. That being said, one-button TFB still has its uses when you anyway oneshot a monster and the fights are spaced out a little (e.g. Geffen Nightmare Arena).
- Gear-Swap combo: The recommended way of incorporating the new Dimensions gear, is by switching gears mid-combo. The autocasts work like a chain, meaning First Brand will cast Second Flame, and when Second Flame is casted, it will cast Third Flame Bomb. This means that using First Brand will result in all three skills being autocasted, but it's also possible to use Second Flame and only autocast Third Flame Bomb. This is the key to success, as it allows to use First Brand without the gear combo in place (= no increased cooldown on First Brand), then swap back to the gear combo and use Second Flame for an autocasted Third Flame bomb. That approach has multiple advantages: TFB is now possible every 0.7s, it can be easier to use consistently (with a good smart-keys setup), benefitting from the higher damage of newer gears without downside.

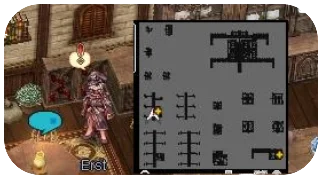
See related image for an example smart-keys setup. The hotkey-slots marked in red need to have smart-keys active in order to automatically have a click on the target when the key is pressed. When setup correctly, it's possible to simply press both keys above, followed by both keys below, to perform the full combo while also swapping gears back and forth. Having Third Flame Bomb on the bar is not necessary anymore as it'll be autocasted after Second Flame. The example shows swapping of weapons, but usually it's better to swap headgears instead to not lose any potential endows. Swapping the weapons allows for multiple Dimension Headgears to be in the inventory at the same time (e.g. if swapping between Explosion Blaster build and Third Flame Bomb build). This whole idea has been adopted from players on kRO.
Stats
- Str: 120
- Agi: 60 - 90
Getting to 190+ aspd is highly recommended for a smoother combo
- Vit: 120+
- Int: 60 - 90
- Dex: 90
- Luk: 30
Traits
- Pow: 110
- Con: 110
- Crt/Wis/Sta: 72
After maxing Pow/Con, the remaining points can be put into any defensive trait. However, I would recommend putting it into Crt if planning to use Explosion Blaster with the same stat-build.
Secondary Stats
- Aftercastdelay reduction: 0% or 40%+
The recent rebalance added 0.7s aftercastdelay to Third Flame Bomb, the last step of the combo. I found 40%+ to be a decent enough value to perform the combo just fast enough. Fortunately, this can already be achieved with offensive endgame gears without intentionally sacrificing damage for it: 15% (Dim Enchant) + 15% (Grade A Glade Rune Manteau) + 10% (Depth Armor) Separate Reload Shadow Shield can also be used to compensate missing gears to some extend. However, when using the new Dimension Gear combo and autocasting Third Flame Bomb after either First Brand or Second Flame (with the swap technique), then 0% aftercastdelay reduction is needed.
Gears
Endgame
| Slot | Items | Cards | Notes |
|---|---|---|---|
| Headgear (Top) |
Yorscalp crown has the highest dmg potential when it procs, but requires  Faithful Bandage [2] (560088) to be able to use it. Without the new weapon, TDRC is still necessary. Faithful Bandage [2] (560088) to be able to use it. Without the new weapon, TDRC is still necessary.Yortus Bishop Card becomes best-in-slot if headgear is +14, and it's tied with Melted Poring at +10. | ||
| Headgear (Mid) |  Gambler's Seal [1] (410233) Gambler's Seal [1] (410233) Melee% or HP% enchants |
 Melted Poring Card (300174) Melted Poring Card (300174) |
Alternatively any mid-headgear with hp% enchants |
| Headgear (Low) | - | Blood Sucker is especially strong on TFB build - extremely high sustain | |
| Armor | Nebula Armor of Power is the current best-in-slot option, but slightly behind Engraved Flame Earth Armor until getting the correct enchants on the Hall of Life accessory or garment. Use Two Eyes Dollocaris Card only if armor is +12, otherwise Shelter Card unless you have these MVP cards | ||
| Weapon |
Faithful Bandage and Dimensions Judgment Knuckle are relatively similar in damage. Zerocell enchants can make Faithful Bandage slightly stronger, whereas elemental/race-specific enchants can make Dimensions Judgment Knuckle slightly stronger in those situations. However, with general enchants (melee% or p.atk), Faithful Bandage can hit higher damage universally. The biggest advantage of Faithful Bandage is the ease of use (no gear-swap), and that it does not require a specific headgear (use of yorscalp crown is possible). With my current setup I found Wanderer Card to be about 0.5% stronger than Punch Bug, but the latter also works against small monsters. For the 2nd slot, Abysmal Knight Card can be ideal as any non-boss usually anyway dies against TFB regardless. Since the release of newest skill-shadow gears, Thanatos is usually only worth it against extremely high def-enemies (reason being that some damage is being sacrificed by keeping new shadow gears on +10/7 to avoid the def-pierce set bonus that breaks thanatos effect). | ||
| Shield |
|
Illusion Guard is usually best-in-slot for raw damage, however after recent findings (thanks Binho) Glacier Guard with the mentioned enchants (flat-atk matters!) can become best-in-slot while Boots of Unknown Life's +200 vit bonus is active. As it also offers more defensive utility, it makes for a great general use option. | |
| Garment | Happy Card is required when using Shelter Card in Armor | ||
| Shoes | |||
| Accessories |  Broken Beta Guards Card (300076) Broken Beta Guards Card (300076) |
- |


Future gears (currently not obtainable)
| Slot | Item | Notes |
|---|---|---|
| - | - | - |
Midgame
Beware, the midgame section tends to be outdated
These are the gears I used while gearing up, and can be considered as a baseline, but definitely also check out the catch-up gears we received afterwards.
Namely: Dim Glacier/Glacier Armors and Gaebolg Armors, which are frequently dropped pre-refined by endgame players, and therefore usually cheap.
| Slot | Items | Cards | Notes |
|---|---|---|---|
| Headgear (Top) | +9  Crown of Beelzebub [1] (400110) Crown of Beelzebub [1] (400110) |
 Bungisngis Card (4582) Bungisngis Card (4582) |
- |
| Headgear (Mid) | Any slotted midheadgear Melee% or HP% enchants |
 Rigid Sky Deleter Card (27351) Rigid Sky Deleter Card (27351) |
- |
| Headgear (Low) | - | Blood Sucker is especially strong on TFB build - extremely high sustain | |
| Armor |
+11 |
|
- |
| Weapon | +9  Glacier Knuckle (560032) Glacier Knuckle (560032)  Glacier Flower Spell (Physical-Element) (311352) Glacier Flower Spell (Physical-Element) (311352)  Glacier Flower Spell (Physical-Size) (311350) Glacier Flower Spell (Physical-Size) (311350)  Glacier Flower Spell (Physical-Race) (311348) Glacier Flower Spell (Physical-Race) (311348)  Glacier Flower Spell (ATK) (311342) Glacier Flower Spell (ATK) (311342) |
- | - |
| Shield | +11  Illusion Guard [1] (460017) Illusion Guard [1] (460017)  Rune of Vitality Lv2 (29010) Rune of Vitality Lv2 (29010) Rune of Vitality Lv2 (29010) Rune of Vitality Lv2 (29010) |
 Elite Rgan Guardian Card (300465) Elite Rgan Guardian Card (300465) |
- |
| Garment | +11  Convertible Physical Wing [1] (480124) Convertible Physical Wing [1] (480124) |
|
- |
| Shoes | +9  Snow Flower Boots [1] (470115) Snow Flower Boots [1] (470115)  Ice Flower Spell (Unlimited Vital) (311120) Ice Flower Spell (Unlimited Vital) (311120)  Ice Flower Spell (Physical Force) (311119) Ice Flower Spell (Physical Force) (311119)  Ice Flower Spell (Stamina) (311113) Ice Flower Spell (Stamina) (311113) |
|
- |
| Accessories |
|
Broken Beta Guards Card (300076) |
- |


Shadow Gears and Costume Stones
| Slot | Item | Notes |
|---|---|---|
| Headgear (Top) |  Sura Stone II (Top) (1002100) Sura Stone II (Top) (1002100) |
- |
| Headgear (Mid) |  Sura Stone II (Mid) (1002101) Sura Stone II (Mid) (1002101) |
- |
| Headgear (Low) |  Sura Stone II (Low) (1002102) Sura Stone II (Low) (1002102) |
- |
| Armor | +10 Maximum Mammoth Shadow Armor (24679) |
- |
| Weapon | +10 Infinity Shadow Weapon (24386) |
- |
| Shield | Durable Shadow Shield is prefered, unless manual TFB combo is used and the ACDR of Reload Shadow Shield is needed | |
| Garment |  Inquisitor Stone II (Garment) (1002103) and Inquisitor Stone II (Garment) (1002103) and
|
Keep in mind that Will of Faith Lv10 is necessary for Inquisitor Stone combo to be beneficial for TFB build
|
| Shoes | +10 Maximum Mammoth Shadow Shoes (24680) |
- |
| Accessories | +9/10 Full Penetration Shadow Earring (24661) and +9/10 Full Penetration Shadow Pendant (24662) |
- |


Note: I believe Infinity Shadow Weapon is necessary since we use Knuckles (100/100/75 size-mods), but was told that the partial RES-pierce of fully enchanted Master Shadow Set does outperform blue shadow gears in most endgame-places.
Huge thanks to Binho who was able to provide some numbers here: Fully upgraded/enchanted Master Shadow Gear can be up to 5~7% stronger in extreme cases (625 RES) and starts to shine at around 300 RES (e.g. Depth monsters), otherwise blue shadow gears are the easier and stronger choice. Additionally, blue shadow gears allow for flexibility to swap single pieces for utility without having to break def-pierce, and are not locked to a single skill like Master.
Buffs and Consumables
- Gentle Touch-Change (Sura): A slightly stronger option than Gentle Touch-Revitalize while also buffing aspd slightly.
- Powerful Faith (Inquisitor): After hp% from buffs have been fixed, +15 P.Atk is our best option.
- First Faith Power → Judge → Third Exorcism Flame (Inquisitor): Required in order to be able to perform the Third Flame Bomb combo at all.
 HP Increase Potion (Large) (12424)
- Red Herb Activator (100232)
 Trans Candy Red (11592)
- Force Booster (102803)


Thanks
Special thanks to these players which helped me along the road with build discussions, theory-crafting and hints:
- Binho
- Eneru (also visit their Inquisitor guide!)
- IntrepidEnigma
- Rgasm
- Toru
- Zapallo
And another huge thanks to the GM team and their dedication!